mybb Support
Importing and Exporting Accounts
Last updated August 17, 2025
What is the easiest way to onboard accounts?
It really depends on your situation and preference.
Self-Registration
- This process is idea if you have all or most of your students and or parents in a room for a class or meeting.
- They can use their phones or tablets to create their account, which will send an email to directors requesting their approval.
- Directors/admins can approve everyones account with one click in Admin Tasks.
- For more information on self-registration, please go to "Onboarding Students & Parents" support page.
Mass Importing
- This is idea if you already have everyones email address and information in a spreadsheet.
- Use the handy "Excel import builder" file to organize the information, save the contents to a new CSV file, and upload on the Admin Tasks page.
Adding individual accounts
- Directors/admins can individually add student, parent, and director accounts by navigating to the respecitve account page under "Accounts" on the left side menu.
What are the required fields for mass importing?
The following are the required fields for ALL accounts.
- Type (Student, Parent, or Director)
- Complete Email address
- First and last name
- Grade (student accounts only)
- Section (student accounts only)
- Prefix (Mr, Mrs, Ms, Miss, Dr for Director Accounts only)
For more information please view our "Importing and Exporting Accounts" support page.
Can parents and students use the same account?
Technically yes, but it's highly not recommended.
Why not?
- Parents are automatically CC'd on all comunication to their child.
- Resettings and remembering passwords can be difficult.
- Directors may want to only communicate (email, message) parents for collecting fees, asking for volunteers, and/or desiminating booster information.
- Some parents may need elevated privileges which student accounts cannot possess.
- You can't assign multiple email addresses to an account.
How do I connect student and parent accounts?
There are several ways to connect accounts.
Once students and parents have an account, they or admins can do one of the following.
- Parents can connect their childs account (or multiple accounts) by entering the childs 4-digit code on their dashboard in the "myFamily" section.
- If parents know their childs 4-digit code on the self-registration page but it's not required.
- Directors/admins can connect accounts by clicking the "Add/Modify Relationships" button in Student or Parent account view.
- Directors/admins can export the account information via the Admin Tasks page, connect the accounts in the spreadsheet and import the account data.
For more information please view our "Connecting Student and Parent Accounts" support page.
What if I get stuck or need help?
No problem! Just shoot us an email at support@myblueboard.com and we'll be more than happy to help!
Updating Existing Accounts via Import
You can mass update any existing field attached to student accounts except Email and Type. These fields must remain the same.
This process is commonly used for updating grades.
1) Export Existing Accounts
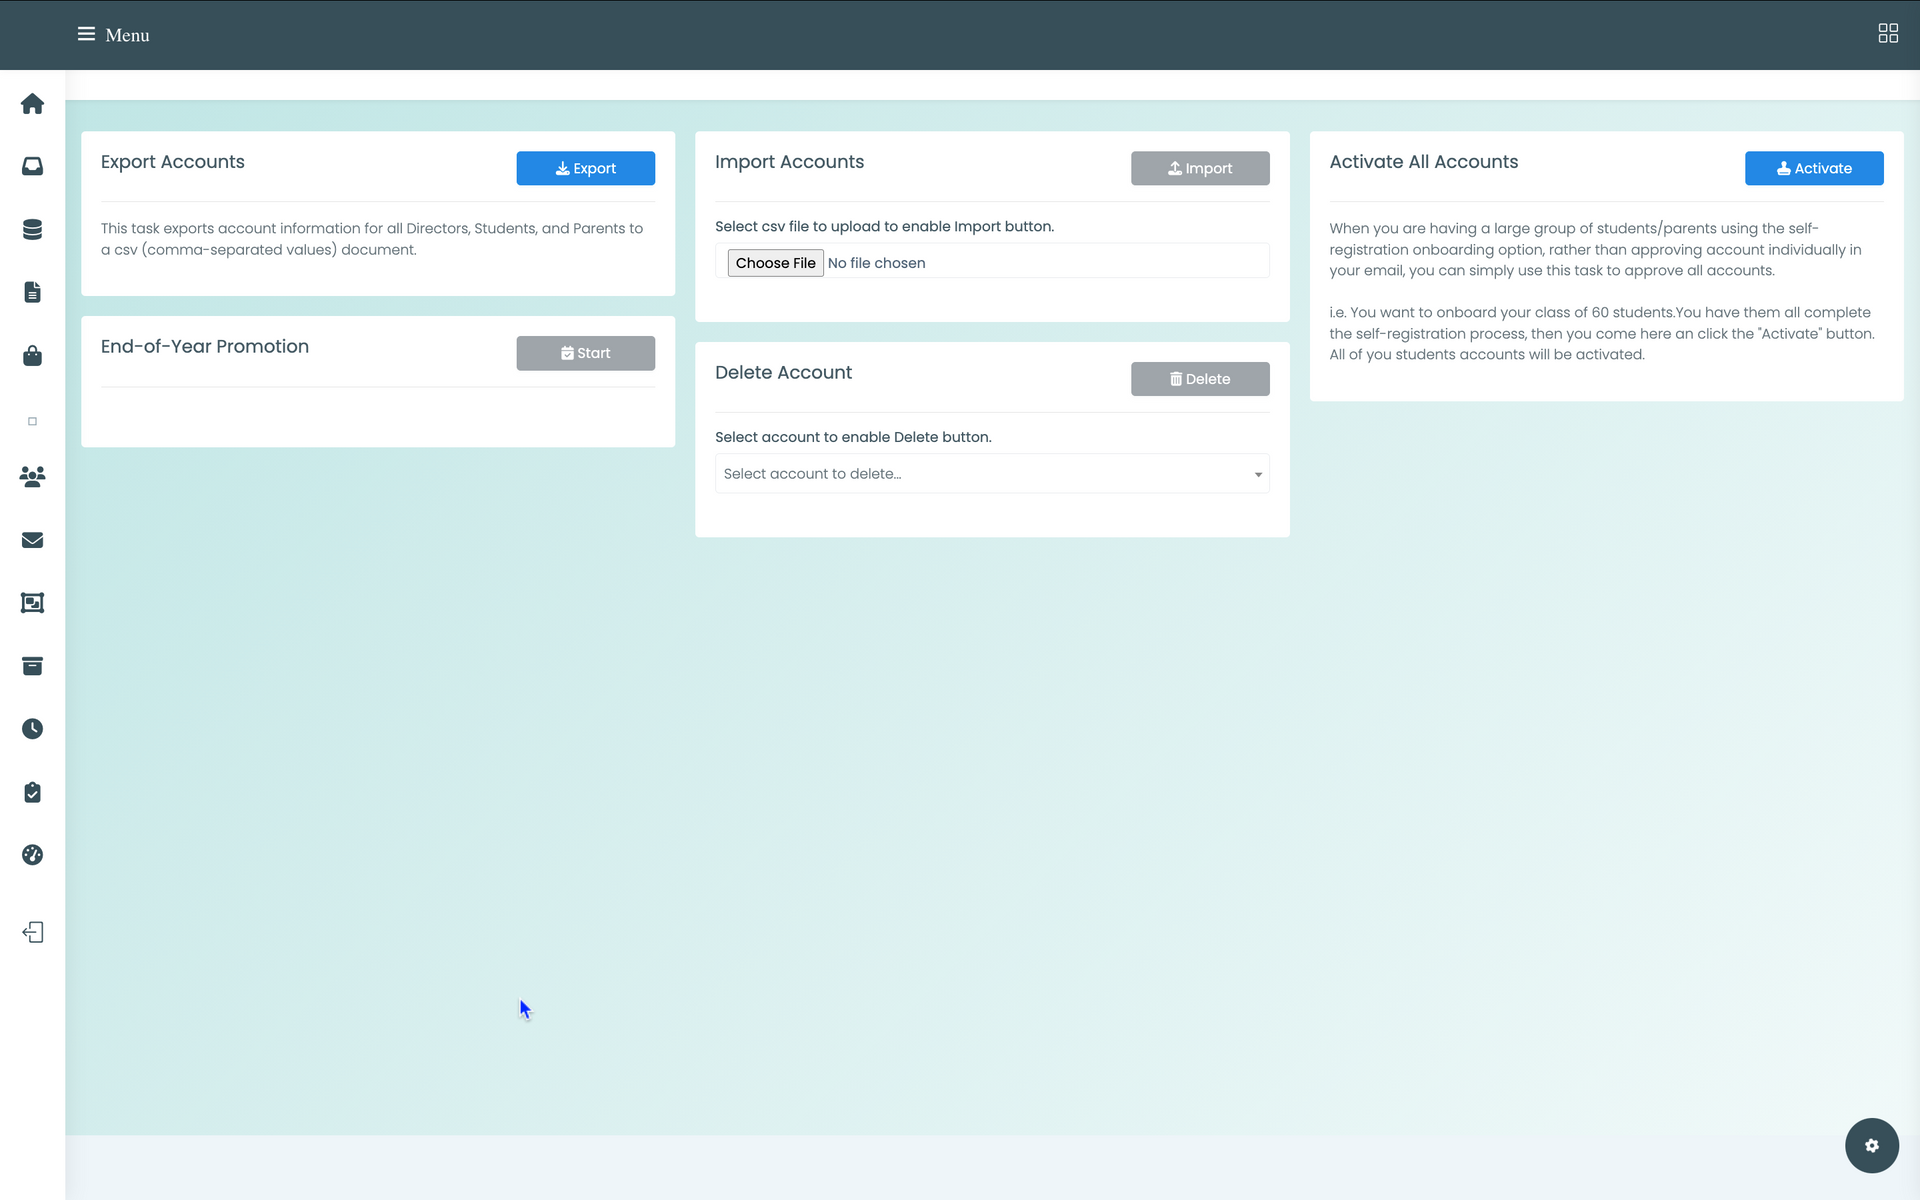
- Navigate to the 4-square icon in the top right corner of your dashboard.
- Select Admin Tasks from the link panel.
- Export the existing account information.
- From the Admin Tasks page (See "Export Accounts via Admin Tasks" screenshot), select the blue Export button from the Export Accounts box.
- File is in CSV format and we recommend using Microsoft Excel to edit.
2) Update CSV File
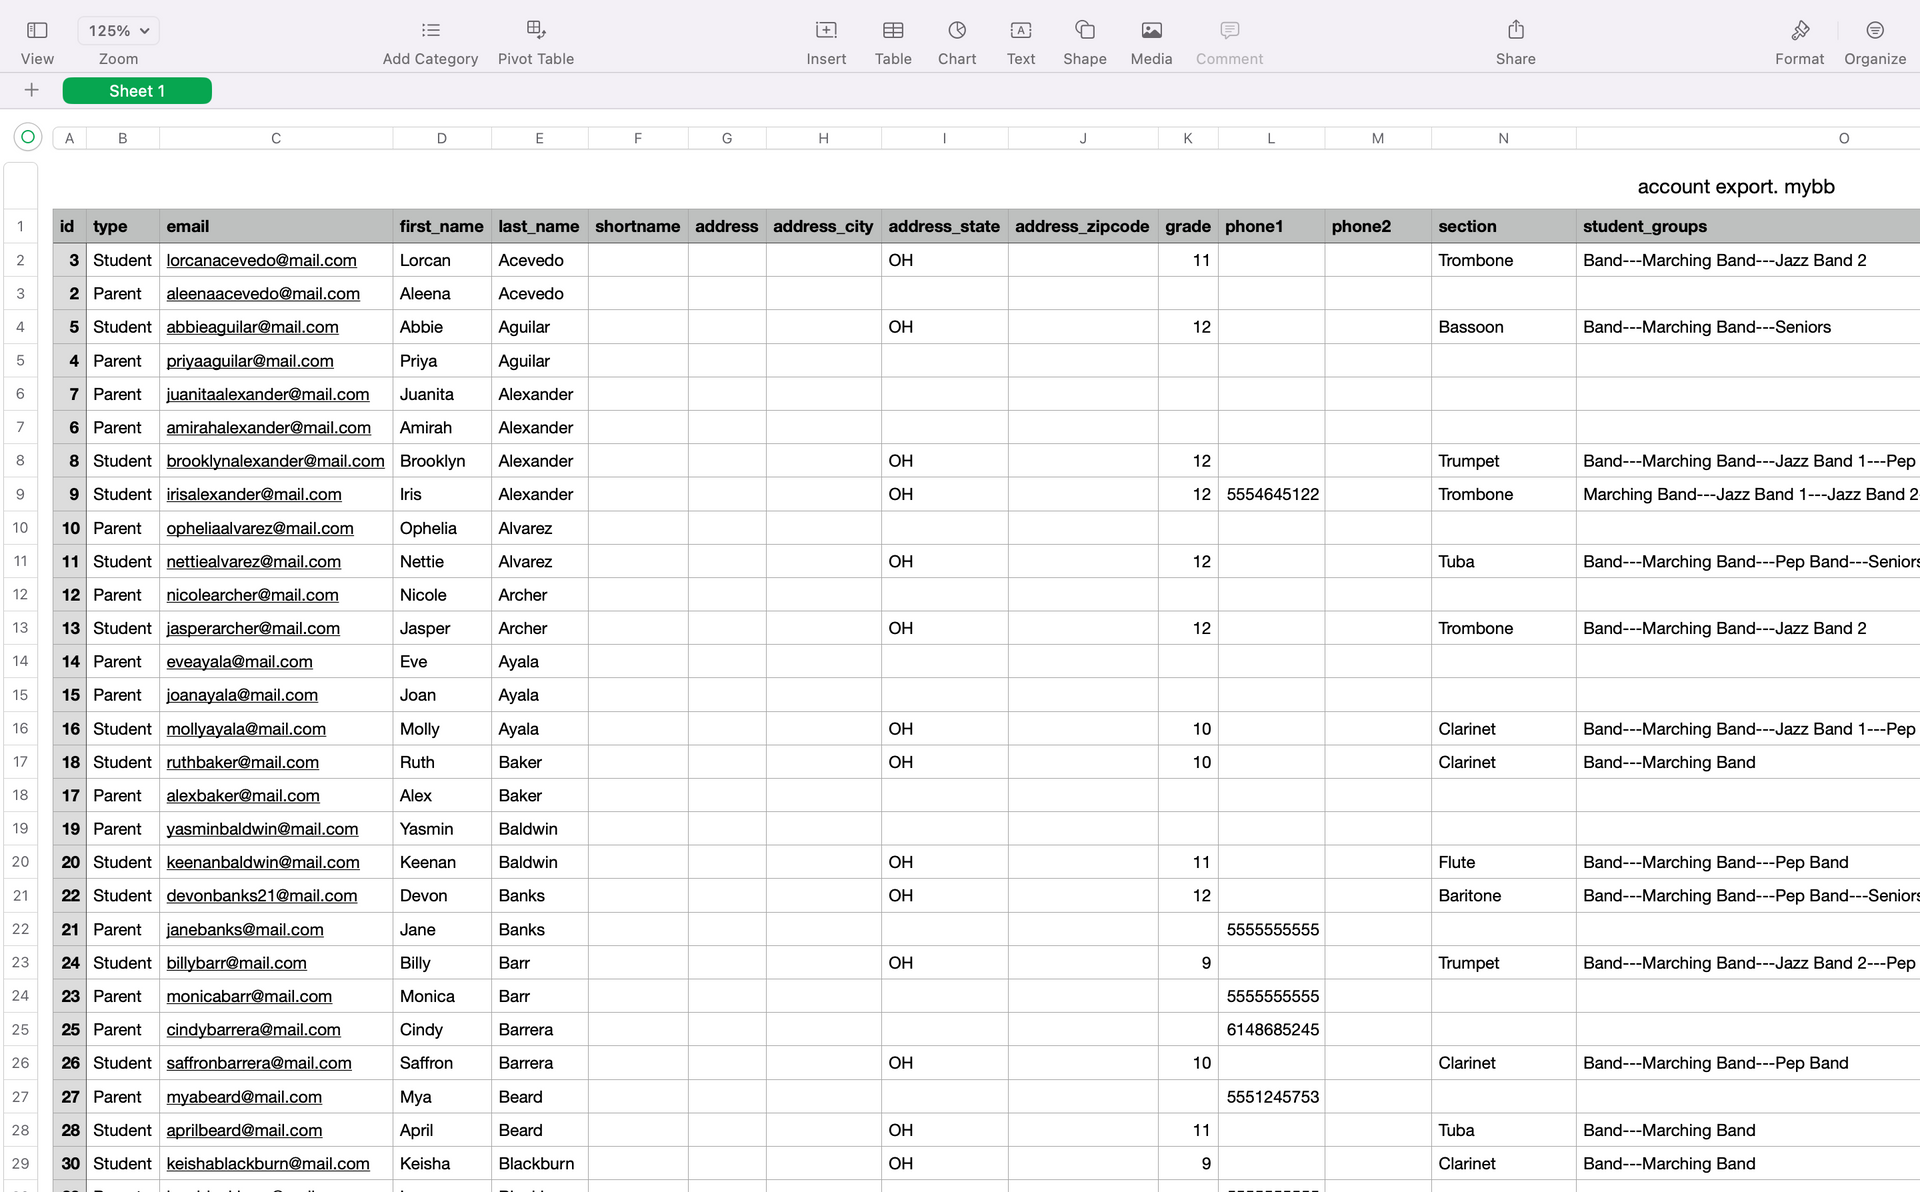
- Open the downloaded file. (See "Export CSV Example" screenshot)
- Delete every column you will not be updating (except Type, Email)
- Make your updates. Remember, you will not be able to update email or type.
- If you are using a Mac, the file may open in the Numbers program. You can make updates in this program, but you must save the file as follows: File > Export as > .csv.
3) Upload CSV to mybb
- Navigate back to the Admin Tasks page.
- Select the Choose File button from the Import Accounts box.
- Upload your updated .csv file.
- Click the Import button.
- If successful, you will see a popup that says the number of changes that have been made.
- If you encounter an error, you will receive a notification about where the error can be found.
- Fix the error, follow the same process and save the file as a .csv again.
- Upload the new, corrected file and click Import.
Onboarding/Importing New Accounts
Where do I start?
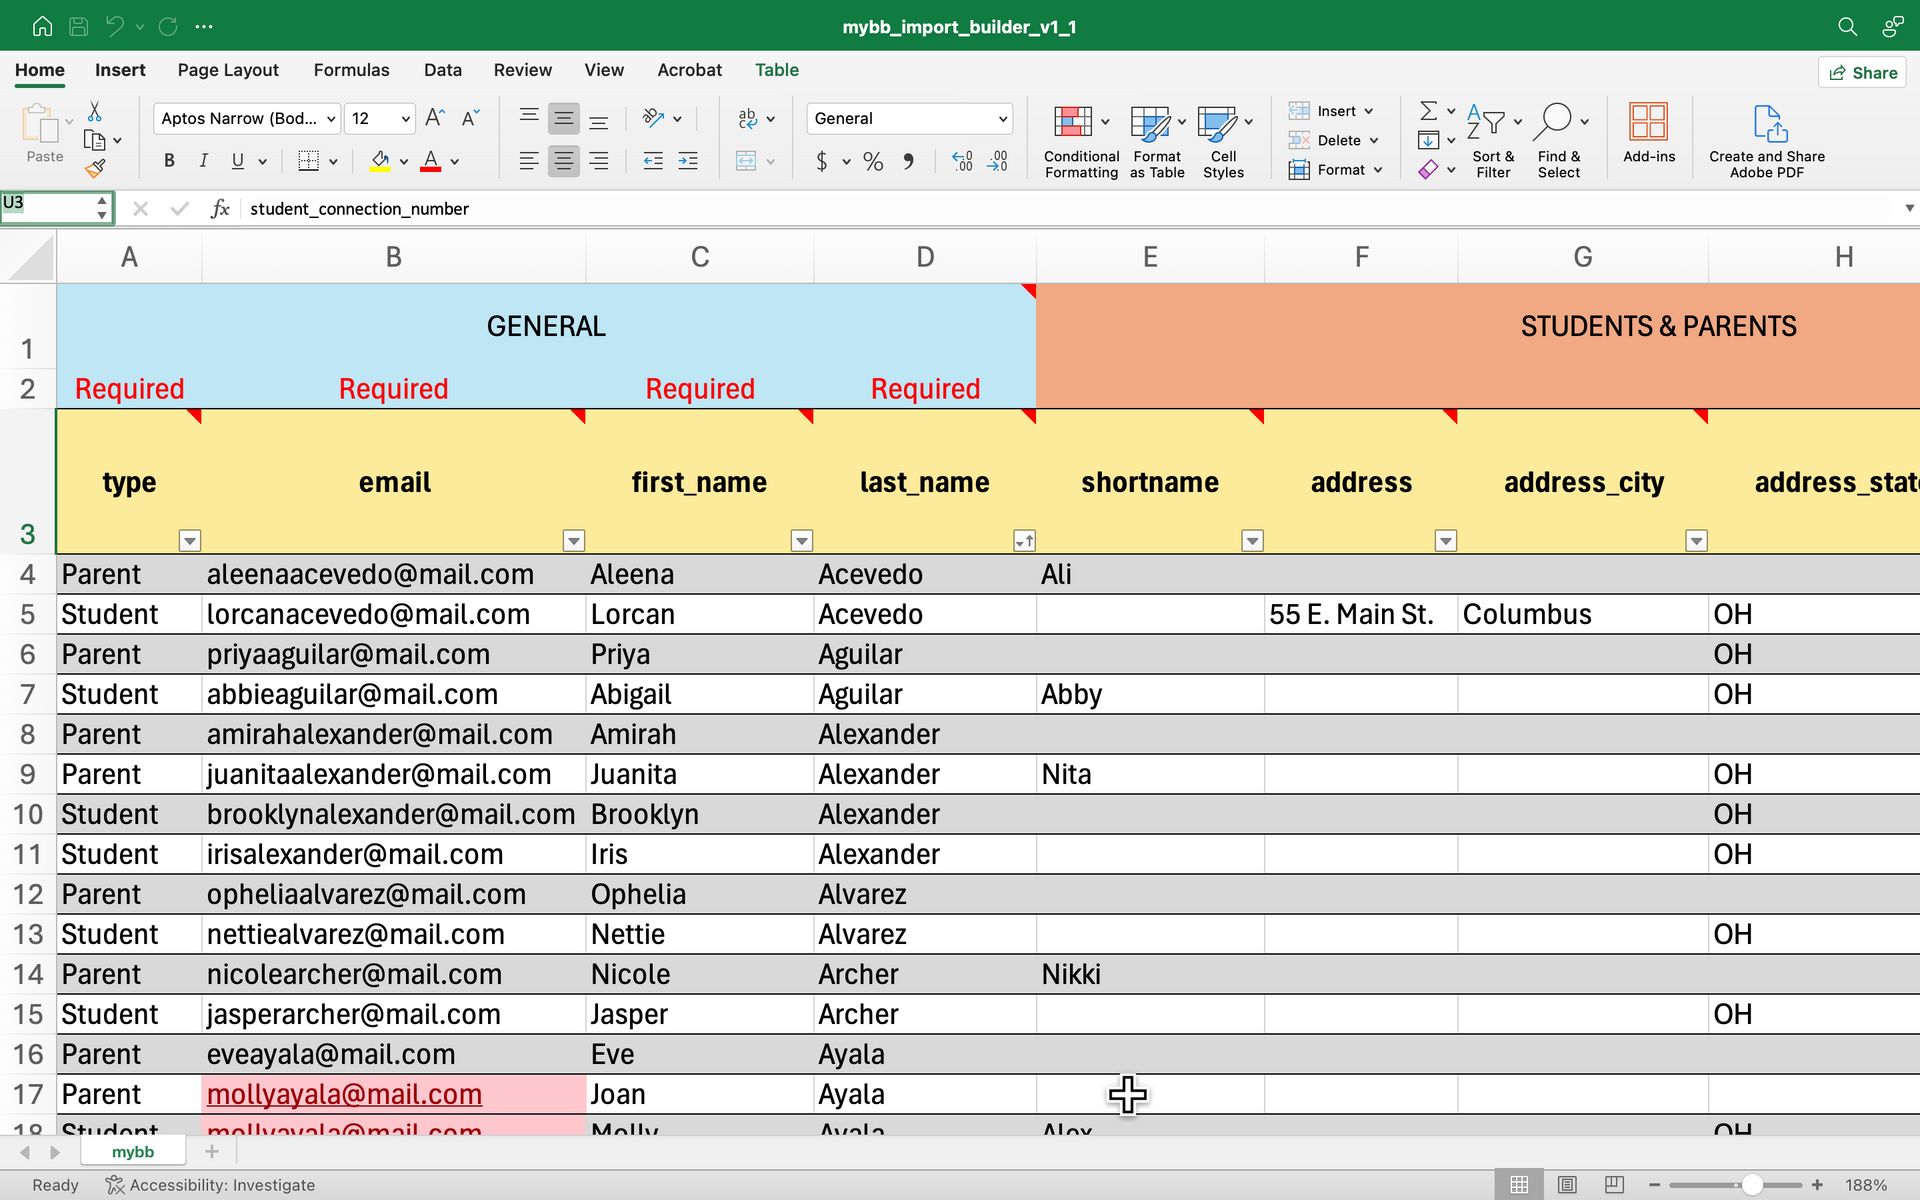
- If you are creating new accounts for your students, parents, and/or directors, then you can start by using this Excel import builder file.
- The builder will help you enter your data to ensure a smooth import process (Image 3).
- If you hover over the titles in Row 3, helpful information for each column will populate.
How do I use the import builder file?
- Enter all your data into the import builder.
- Review which columns are required and optional.
- IMPORTANT TIPS:
- Don't worry about getting all your data into the import builder.
- You can always update fields individually in the app or perform a mass update at a later date.
- Most organizations only complete the required fields for the initial onboarding.
- Required columns
- Required columns for every account type:
- type, email, first_name, last_name
- Additional required columns for student accounts:
- grade and section
- Additional required columns for director accounts:
- title and prefix
- Optional columns
- Columns E-I are optional fields for Students and Parents.
- Columns J-K are optional for Student, Parent, or Director accounts.
- Columns L (grade) and M (section) are required fields for Student Accounts.
- If you don't know the section, you can write "unknown".
- Columns N-U are additional optional fields for Students.
What do I do after I enter my data in the import builder?
- Save the Excel file.
- Step 1: Copy data to new file and save as CSV
- Copy all rows starting at row 3. DO NOT copy rows 1 & 2.
- Go to File > New to open a new spreadsheet.
- In the first column of the first row, right click and Paste and your data will populate in the new file.
- Save your file as CSV UTF-8 (Comma delimited) (.csv) or Comma Separated Values (.csv).
- Step 2: Upload CSV file to mybb
- Navigate back to the Admin Tasks page in myblueboard.
- In the Import Accounts box, select the Choose file button and upload your .csv file.
- If there are any errors in your file, you will be prompted with the reason for the error.
- Correct the errors in your file and resubmit.
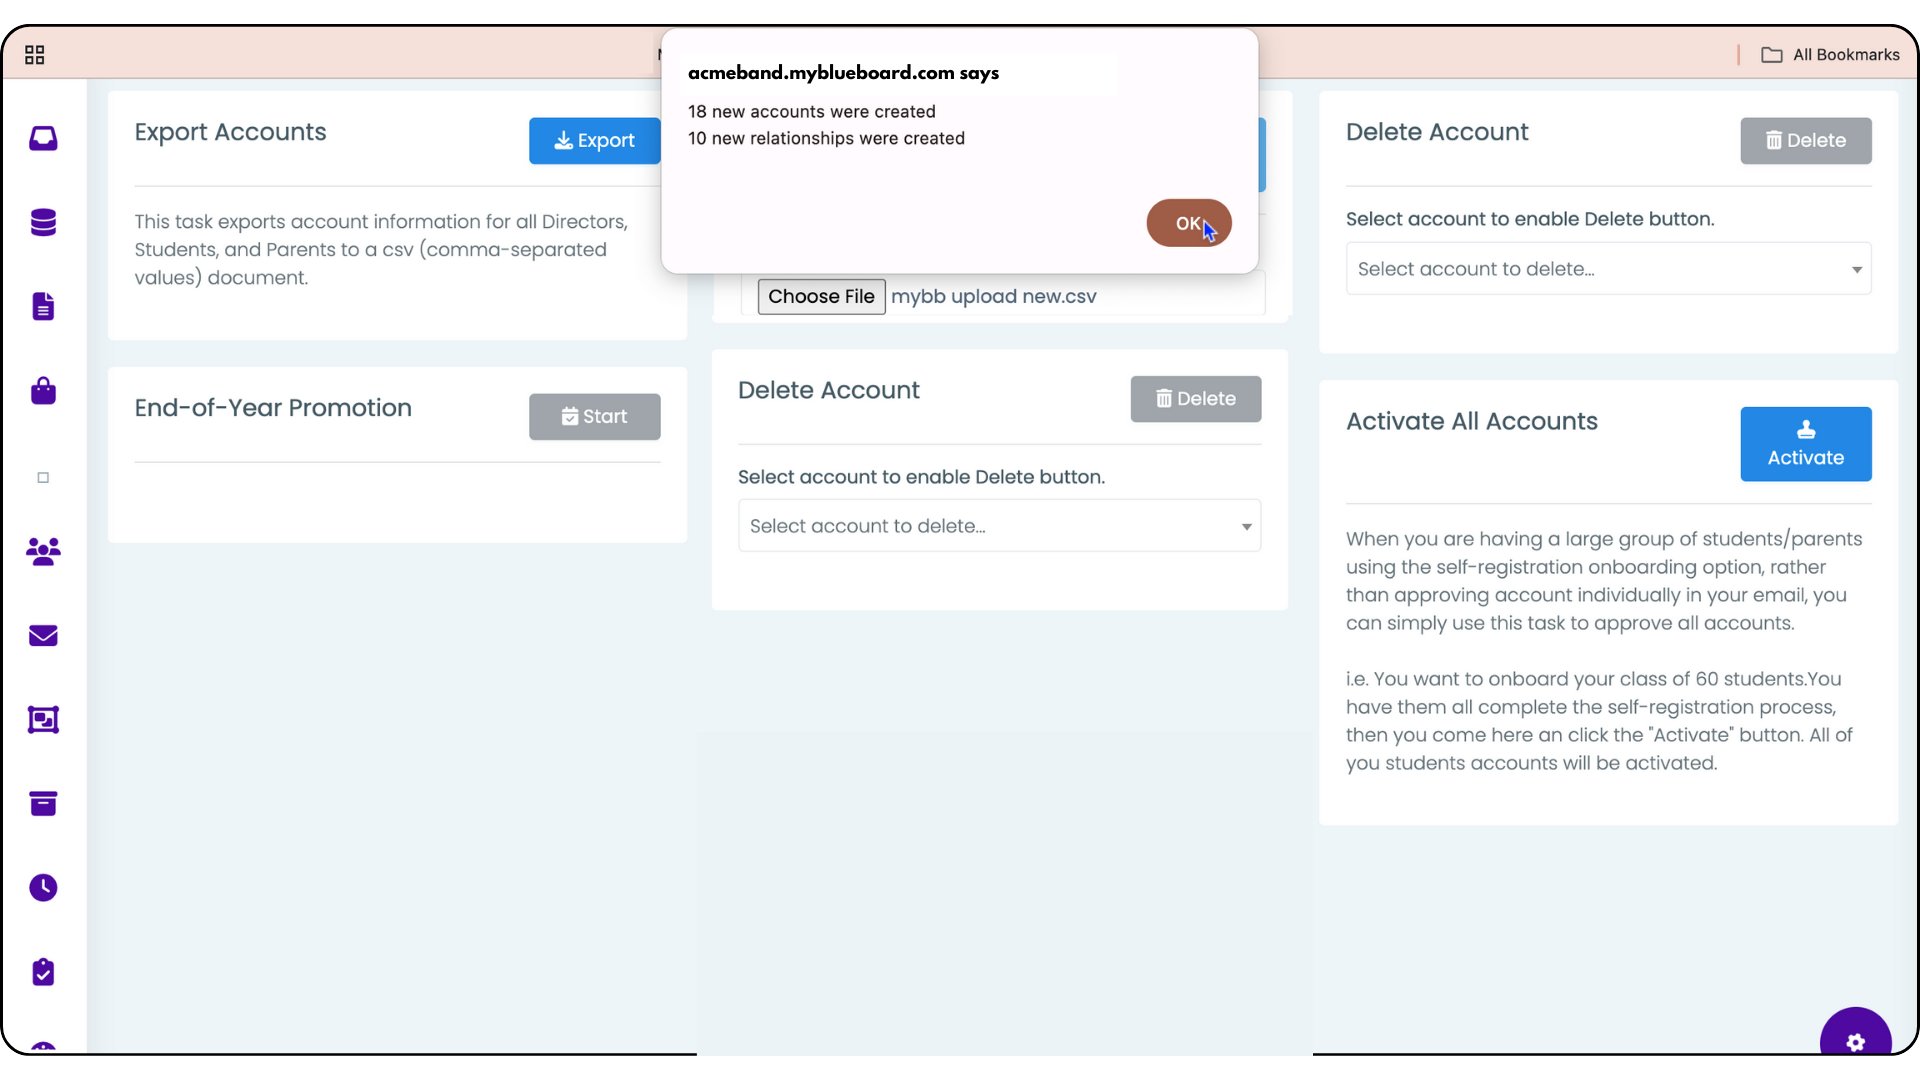
- When your import is successful, a popup will notify you of how many accounts and relationships were added (Image 6).
- You can see all new accounts by navigating to the left sidebar > Accounts > Student Accounts (or Parent and Director).
- Step 3: Inform everyone how they can login
- Students and parents can access their accounts by using your custom mybb URL and selecting the Forgot Password button.
- They will be prompted to enter an email to reset their password and they must enter the email you uploaded into myblueboard.
- They will receive an email to reset their password and then they can login to their new account.
Excel Import Builder Screenshots and Helpful Information
Type
- Can only be Student, Parent, or Director.
- You cannot add additional Types.
Multi-Value Fields
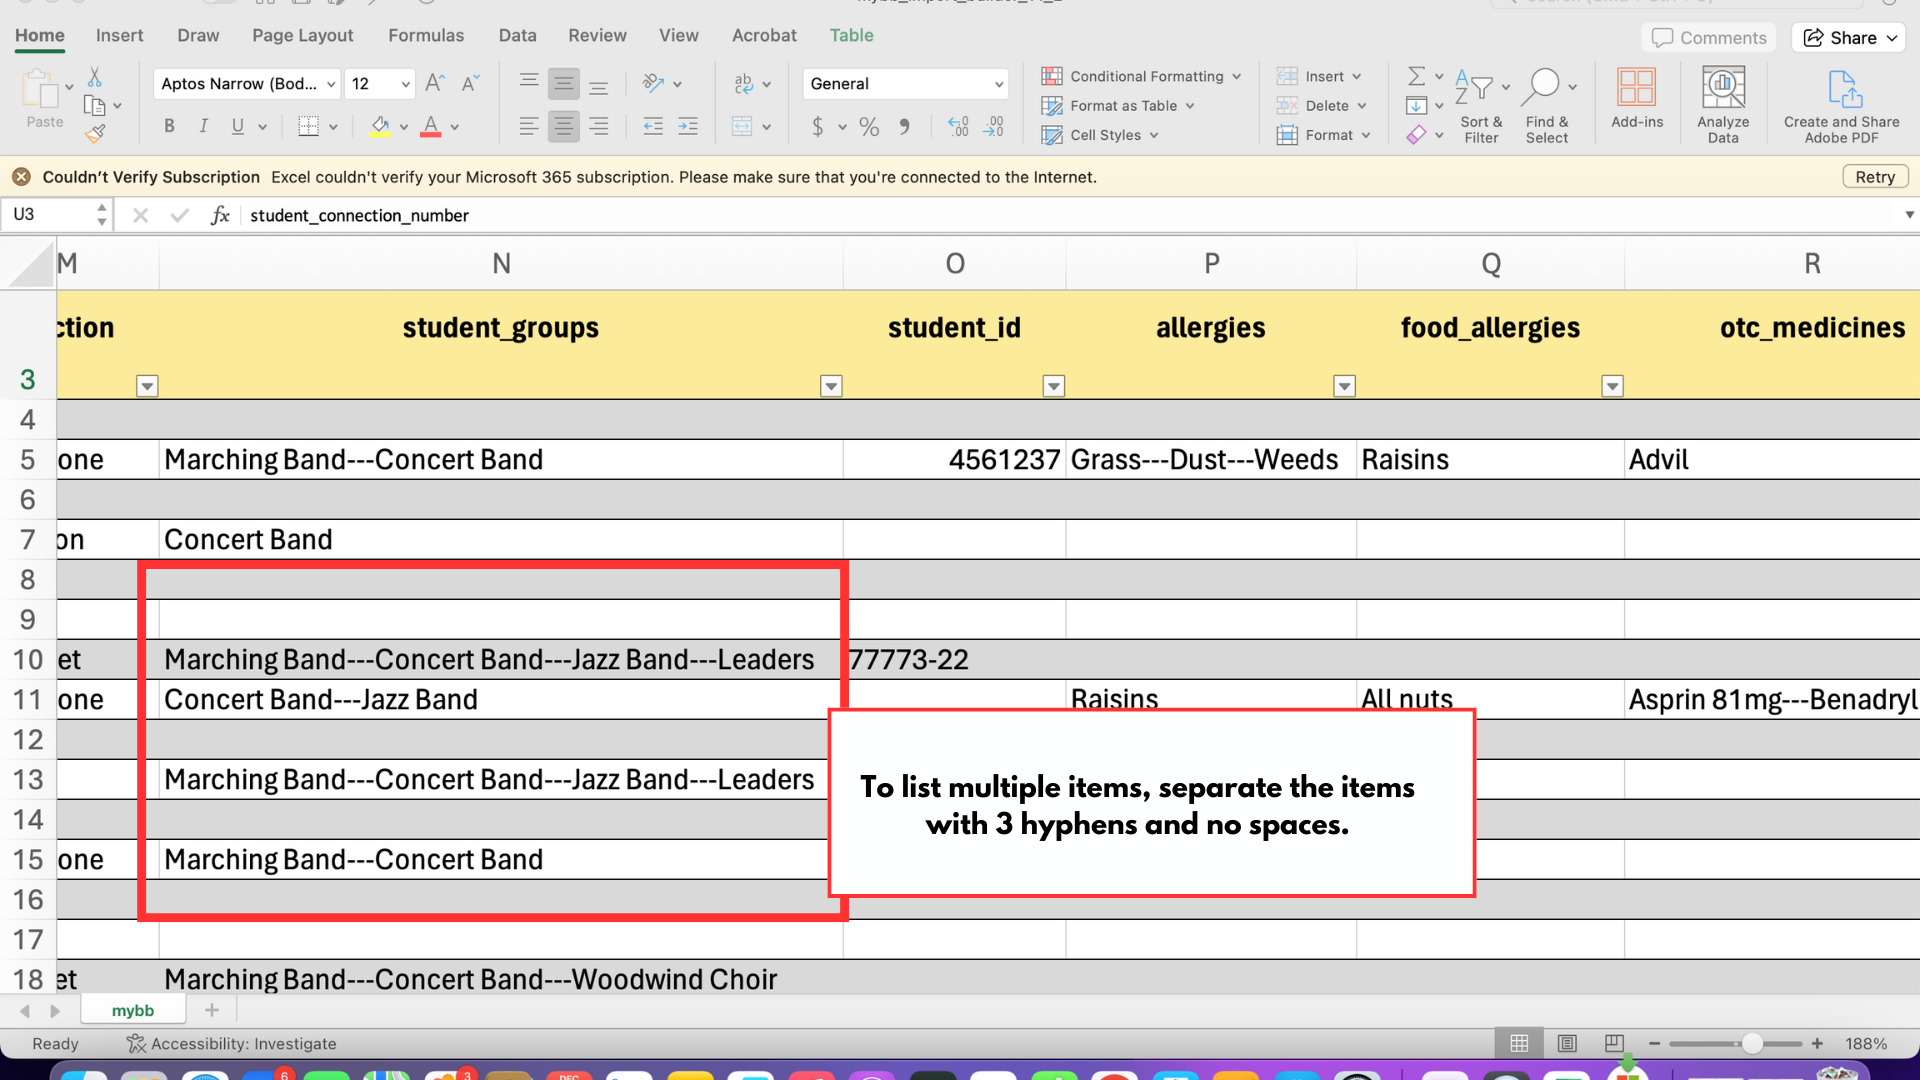
- Some fields are have more than one value. These are called Multivalue Fields.
- Multivalue Fields included in this builder are Student Groups, Parent Groups, Allergies, Food Allergies, OTC Medications, and Child Relation.
- IMPORTANT NOTES:
- Do not separate these values with commas.
- You must use 3 hyphens with no spaces before or after multiple values.
- Example:
- For Student Groups, "Marching Band---Jazz Band---Concert Band " (Image 4).
Student Groups & Parent Groups
- You can add any Group you choose and it will create the Group in your myblueboard app.
- However, if there is a misspelling, it will create a new group and it is also case sensitive.
- For example, if one of your group listings is Boosters, and you add boosters to someone else's group listing, it will create a new group for the all-lowercase boosters.
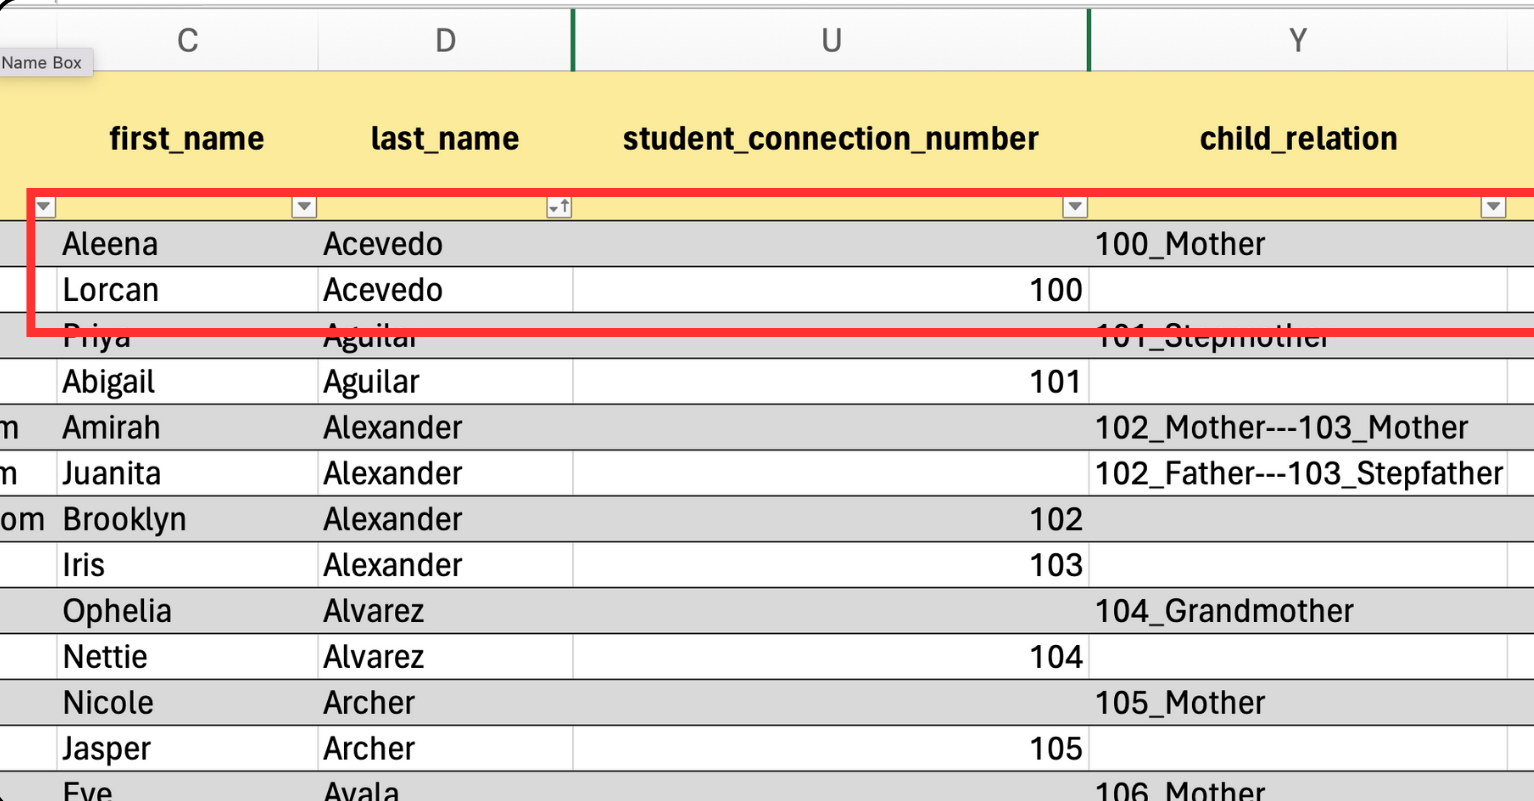
Student Connection Number
- The Student Connection Number is used to connect Student and Parent Accounts.
- In the example below (Image 5), you can see Lorcan Acevedo's Student Connection Number is 100. To connect his account to Aleena Acevedo, his mother, we enter his Student Connection number 100_mother in the Child Relation column for Aleena.
- You must use an underscore with no spaces before or after.
- Directors cannot connect their account to a student.
- If the director has a child in myblueboard, we encourage them to make a separate Parent account with a personal email.
Import Accounts: successful import message
- You can see all new accounts by navigating to the left sidebar > Accounts > Student Accounts (or Parent Accounts / Director Accounts).
- Students and parents can access their accounts by using your custom myblueboard registration URL and selecting the Forgot Password button.
- They will be prompted to enter an email to reset their password.
- They must use the email you uploaded into myblueboard.
- They will receive an email to reset their password and then they can then login to their new account.
